

The best single target carry just dropped, and I’m saying that because I do count Seele as an honorary AoE unit.
Not only did his banner come out, but as we all know, we are getting a free copy of him in the mail today. That will depend on your server time, but Asia will be getting it first.
His damage from testing and from calculating with teams has shown us some impressive results, so I’m happy we are getting such a powerhouse for free. Yes, it might suck right now with the AoE oriented Pure Fiction, but with enough cope, maybe a Boss hunt mode can come out, and in MOC at least he does great from testing.
So I’ll go through his kit real quick, nothing too special but some nice things to know, then I’ll review his eidolons, emphasizing his E1 since he is free.
I’ll then go through his best relics, light cones with his signature, energy rotations, pros and cons, and synergies. Like and sub if this helped, and let’s begin.
Overview, Stats, Trace Priority
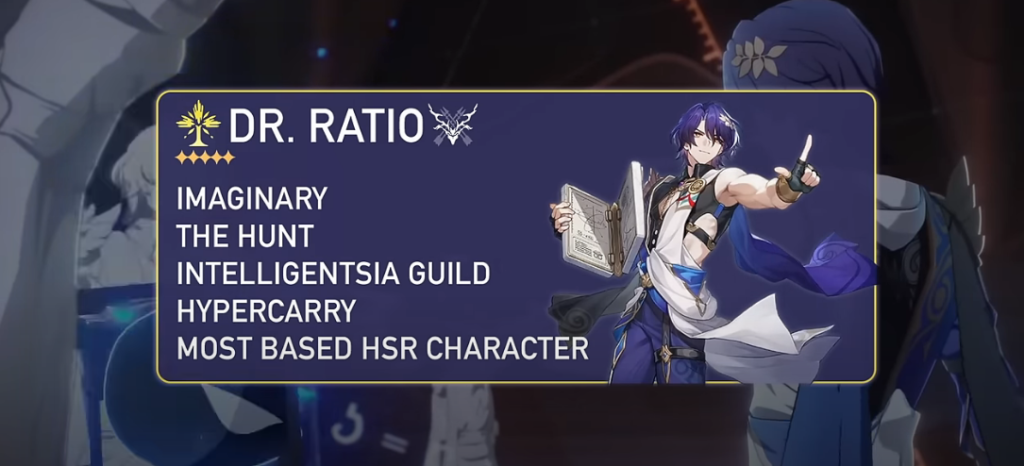
Dr. Ratio is a 5* Imaginary Hunt unit and our first of this combo. Hunt units are DPS that love single target and attack many more times than a traditional DPS. Dr. Ratio will be doing so with out of turn follow up attacks.
At level 80, he has a base HP of 1047, a base defense of 460, and the highest base attack so far at 776. He has a decent speed of 103, and a high energy cost at 140.
For trace priority, you’ll want to prioritize his talent, followed by his skill and ultimate, then his basic, which doesn’t need leveling. His basic attack is a lot of fun, but nothing important to his kit.
Skill Explained
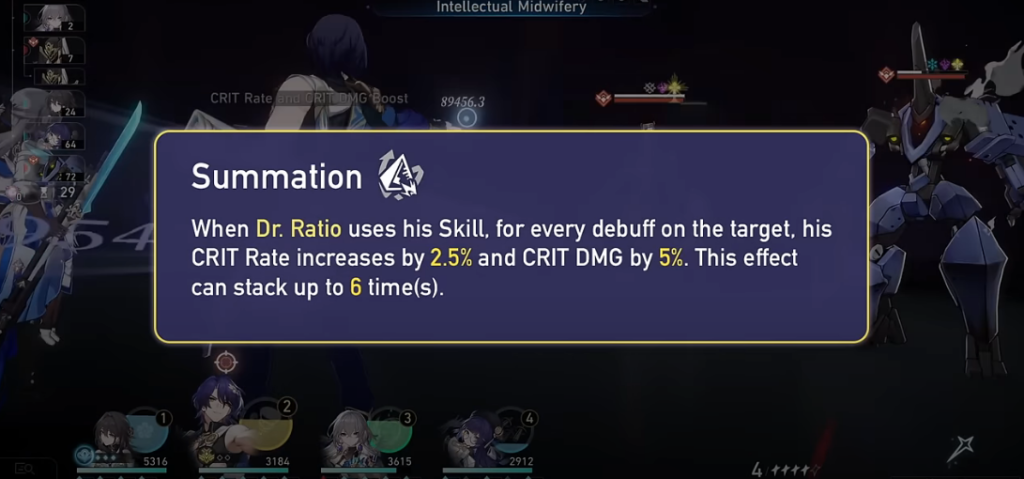
His skill, however, will deal a nice amount of damage to a single enemy. Not only that, after unlocking his A2 passive, this skill then increases his crit rate and crit dmg up to 6 stacks depending on the debuff count. This will stack every skill until those 6 stacks are fulfilled, for a free 15 CRIT Rate and 30 CRIT DMG.
After unlocking his A4, this skill also gains a 100% base chance of reducing the enemy eff res by 10%. This requires 43 to 67% Effect hit rate to guarantee at endgame, and you shouldn’t be building for it, it’s just a nice bonus.
Talent
If that wasn’t enough, his skill activates his Talent. He will have a 40% fixed chance every time he does so to activate Cogito, Ergo Sum. This is a high damaging and single target follow up attack. Every debuff on the enemy will increase the fixed chance, fixed chance meaning no effect hit rate from Dr. Ratio’s side, by 20%. So from 3 debuffs alone, we are hitting that requirement.
If the target enemy is defeated by the initial Skill though, the follow up will then go on another target, which means we are wasting nearly no follow ups at all from the Talent. These talent hits generate 5 energy, for 35 energy generation per skill.
How to Use His Ultimate
His chalk throws are going to be most of Dr. Ratio’s DMG. We’re talking 70% of his damage profile. Ratio’s Ultimate is of course also single target and will do damage and apply Wiseman’s Folly to the enemy you strike. This is not a debuff. When allies attack said enemy, Ratio will replicate his talent against them for two times guaranteed, no fixed chance needed. Wiseman’s Folly is not a debuff, though unfortunately, but it will last on that enemy until it dies.
Furthermore, if that enemy dies, it won’t be transferring to anyone else, so one problem he has is his ultimate usage. You may end up wanting to ult a high health secondary elite and focus your main attacks on a lower health enemy. This can also I guess make him more than single target though as a bonus, since your skills and talents will hit one enemy, but your ult and ally activated follow ups can attack another. If you are versus one main target and they are low, you can ult to finish them off. If you have a wave approaching just after, save the ultimate.
The Funniest Technique
Finally, his technique creates a dimension, and only one dimension technique can happen at the same time, so no stacking with Welt. It will taunt enemies nearby, look super awesome, reference Jojo, and then do actual useful in combat things.
When entering battle, all enemies will have a 100% base chance from Ratio to have their speed reduced for 2 turns. This will apply to every new wave since it’s a dimension, and is a debuff, and a very useful one. Great for ramping up his damage.
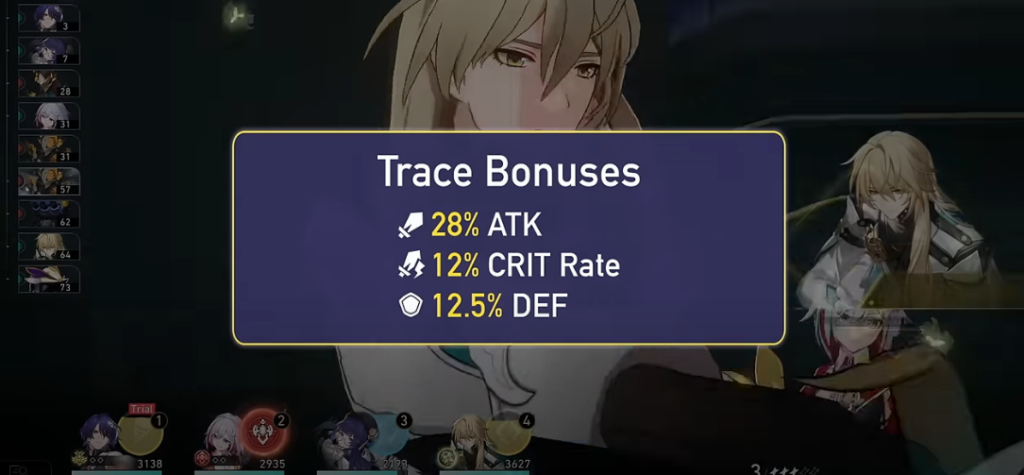
Now to top things off, not only does he gain crit buffs and extra follow ups from debuffs, his final ascension passive not mentioned is Deduction, and will increase his DMG% by 10% for every debuff, starting from 3 minimum debuffs and maxing at 5, for a total of 50% DMG. The man gets a lot of benefits from debuffs as we are seeing. Finally, Ratio will be enjoying a 28% ATK complementing his extremely high base atk, on top of 12% CRIT Rate, and 12.5% DEF from his trace bonuses.
Before eidolons, let’s quickly review some common debuffs as well as some common mistakes for debuffs. The man needs them, so it’s important to know how we get them. Break debuffs are still debuffs, so when you break an enemy and they get Entanglement or Shock, that will count as a debuff. DoTs are debuffs. DEF Reduction from Pela, and from the Resolution Light Cone, are debuffs. Topaz’s Proof of Debt is a debuff, so is the Tame effect from her light cone, as well as the Debtor state from her E1. Ruan Mei’s ultimate mark is a debuff. You can check to see if something is one by applying it and checking the enemy’s status page in combat, and it’ll show up as one in the page.
Some commonly mistaken effects that aren’t actually debuffs are Hanya’s Burden from her skill, and Clara’s marks of counters. They are just marks on the enemies, do not show up as debuffs on their page, and do not count for any debuff checks.
Eidolon Review
Onto eidolons since his E1 is technically the first copy you can pull unless you’re starting after 2.1. It will increase his first ascension passive’s stack count by 4, as well as immediately giving him 4 stacks at the start of the fight. This means he starts off the fight with an immediate increase of 10% Crit Rate and 20% CRIT DMG, and overall can get up to a max of 25% CRIT Rate, 50% CRIT DMG from his Summation trace. Pretty awesome starting eidolon.
His E2 offers additional damage on top of every follow up attack for 80% of his ATK, 20% per debuff, leading to a very strong damage increase overall considering his follow up is very core to his kit. This will include his ultimate activation follow ups.
His E4 grants an additional 15 energy per follow up, fixing his wonky rotation and enabling many more ultimates, which again, means a ton more damage. (this was bugged, fixed in spreadsheet) This energy trace goes pretty insane because of how many follow ups he will be getting.
His final Eidolon increases his Ultimate’s trigger count by 1 for a total of 3 Folly stacks as well as giving his talents a 50% DMG buff. A final amazing eidolon. This eidolon empowers his E4’s energy gain and gains more use out of his E2. The trigger count increasing by 1 still has the same previous problems, and my calculations will overstate its power since the enemy in the simulation doesn’t die, but at that point you probably don’t care how strong it is.
Dr Ratio Best Relics
Onto relics. Dr. Ratio’s best relics are situational, but a general best in slot will end up being the 4 Piece imaginary set. He will want and even be applying debuffs, so the 10% Crit rate is a given. The 20% CDMG is easily acquired with his frequent and high toughness damage attacks too.
If you are facing Quantum Weak, you’ll want the Quantum set for its 20% DEF ignore, synergizing fantastically with his signature as we will see. Quantum and Imaginary weakness pretty much never coincide though, and bringing Dr. Ratio to Quantum weak just for the set bonus isn’t going to be a good idea without Silver Wolf.
Instead, you should run this set in the occasion you fight the very rare enemy that has both weaknesses, like the Swarm Boss, or if you plan on using Silver Wolf who will end up being a great partner for him anyway. This set is still okay to use into non-quantum weak and will still be providing some def ignore.
Finally, a mix and match of dmg%, follow up dmg%, and atk% sets are all great and easily farmable budget options.
Planar Sets
For planar ornaments go for Glamoth if you are hitting it with your substats or external spd buffs like Messenger and Ruan Mei. Space Sealing Station is very close because the man has so much crit and DMG% and that atk% is nice. Inert Salsotto is the final other best option, and all are close enough to consider all of them.
Dr Ratio Main Stats & Stat Goal
For main stats, you’ll want a crit rate or crit damage chest, optimizing your crit ratio based on your light cone and his 12% CRIT Rate trace. You’ll want speed boots, DMG% or ATK% orb, and an attack% rope. The choice between DMG% and ATK% is dependent on substats and your team comp, a team with Ruan Mei is going to want ATK% much more. Either way, both are close enough so choose whatever piece is best.
For an endgame stat goal, you’ll want to hit 3000 ATK, 75/150 CRIT Ratio, with it becoming 90/180 in-game with his Summation trace. For speed, 135 for the 134 breakpoint and to activate Glamoth, and you can go lower if you have external SPD buffs that are consistent.
Dr Ratio Best Light Cones
For light cones, let’s first tackle his Signature. First of all, the art is amazing but the effects are really cool too. An initial 20% CDMG, with an additional 24% if enemies have debuffs, which they will.
When the wearer uses their ultimate to attack the enemy, they gain this Disputation effect for 2 turns. This will give a universal 36% DMG buff to all attacks he will be doing, and then make his follow-ups only ignore 24% of the enemy DEF. 24% DEF ignore is equal to a 14.38% DPS increase on those bad boys. A pretty overloaded light cone and very niche to him. Perhaps usable on Yanqing only otherwise.
His other best option will be Topaz’s Light cone if you accidentally dropped that during her banner. It’s for a follow-up DPS with supportive capabilities, but that supportive power buffs him anyway, and he will be fine with some dual DPS compositions, meaning this can help out that second DPS too.
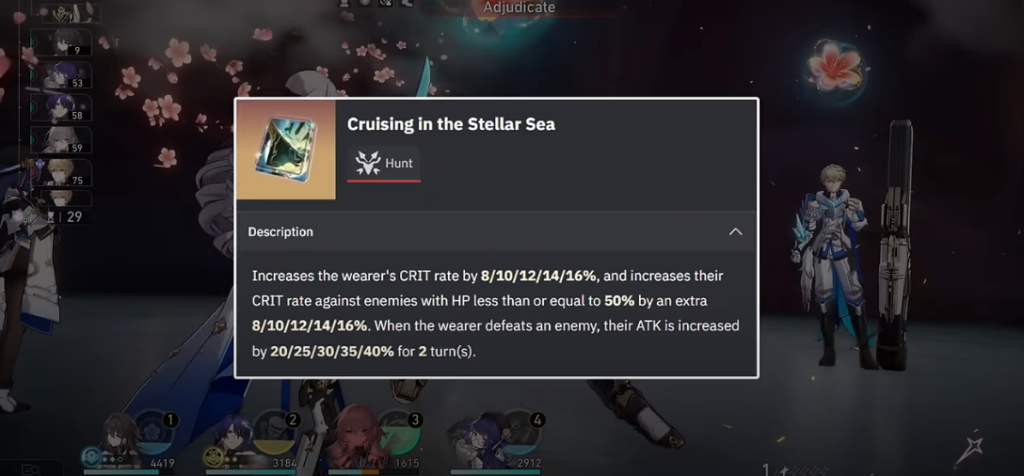
Then Stellar Sea is his third best option. The rest are all too conditional or just bad. Swordplay is terrible on him due it stacking very slowly from his low hit attacks, and he will be target swapping a lot. In a pure one target environment it’s nice, but that’s not happening until Pure Fiction Hunt Edition. In the Night doesn’t give much to him, Sleep Like the Dead doesn’t either and his low hitting abilities hurt the impact this light cone can give just like with Swordplay.
Energy Rotations
For his ultimate cycling purposes Dr. Ratio needs 4 Skills into 4 Talents to gain back his ultimate; however, that’s not considering the team-activated follow-ups from his Ultimate. If we include them we can hit a 3 turn Ultimate provided we end up killing two enemies, which I feel is definitely doable. These two kills are replaceable by a Huohuo ultimate.
Finally, if we consider an E6 Tingyun, Dr. Ratio can hit a 2 turn ultimate, but it won’t be available every Ratio rotation in a standard build.
Dr Ratio’s Strengths
Now before we talk about synergies let’s talk pros and cons. For pros, the man has some disgusting single target power. The trial version people got was a poorly optimized Ratio and he still slapped the enemies.
He also can be not restricted entirely to a single target if you have two targets that are chunky enough by using your ultimate on the second enemy. This is niche to 2+ elite or boss situations but it can happen. He has a very nice base kit too with self buffs of 50% DMG, 15% CRIT Rate, 30% CRIT DMG, and two strong offensive traces, and the highest base attack in the game. This also means at low investment he can still do great for newer accounts. Great single target toughness damage is great with the increase of toughness bars we’ve been seeing lately. Breaking has become much more important to help sell Ruan Mei in my opinion. Finally the chad is completely free. No pull accounts, collectors, husbando wanters, f2p players, everyone is winning.
Dr Ratio’s Weaknesses
For cons, we have the same as the pro. He is a single target DPS. The follow-ups save him, since they can attack random enemies if the original enemy is dead, and then especially with the way he can redirect his ult follow-ups, but he will be struggling versus 5 enemy stages, unless you’re a pro.
We have the debuff restrictive compositions. He brings a couple himself, but you will be needing some form of debuff on the team. Luckily we have a ton, but this can be annoying to rely on for damage, and we’ll always need to have one dedicated debuffer.
Finally, if you don’t have Stellar Sea free for whatever reason, his other options are either limited, or weak. Apart from that, I don’t see too many problems with Ratio. So let’s finish off with some synergies that let us build into teams.
Dr Ratio Best Teams
Most debuff units are going to be considered, but not all. We aren’t going to run a Sampo or a Luka + Ratio team comp. I mean, you can, but I don’t recommend it.
We will be looking at achieving 5 debuffs in total, thus 3 ally debuffs needed. This is because with breaks, your third or fourth ally perhaps having a random debuff, and then his own debuffs, we can consistently hit that 5 count that we want.
Pela & Guinaifen
Let’s first start with Pela, a strong damage amplification unit. Pela offers one debuff on her ultimate, def shred. With E4, and a SP Positive third slot, we can easily start using our skill on Pela for an additional debuff, going for a skill neutral playstyle.
With the resolution light cone, we can supply the third debuff required. This, with energy rope and vonwacq, nearly achieves a 2 turn ult just like Tutorial would too, and can be fully achieved with external energy, luck, or E1 procs.
Guinaifen is a more offensive version of Pela with some damage amping power too. The reason I like her is she can offer aoe DPS when ratio lacks it on weaker enemies, something Pela isn’t traditionally built to do. Her vulnerability is unremovable and easy to apply, she has a burn DoT, her E1 is a third debuff, and she can hold the Resolution Light cone for a fourth for more enabling and damage amp combined.
Dr Ratio Topaz
Topaz is going to be a dual DPS treat with Dr. Ratio in single target scenarios, but the power of the two together can probably do so much damage in and out of turns that 3 target fights won’t be a hassle. Topaz’s Proof of Debt is a debuff and is a vulnerability modifier separate from all those crazy buffs he’s already getting. That 70% of his damage being follow ups can now get a 1.5x DMG increase. The only problem would be if you do end up using your ult on the non-Proof of Debt enemy.
If you pulled E1 Topaz, that is more damage amp for both units, and another debuff. If you pulled her signature, the same thing. At E1S1, you get 3 debuffs from Topaz. The two complement each other extremely well and were obviously designed together in mind. She gets more Numby procs, which means more damage than usual, and Ratio profits from her amp power. Numby can even activate ultimate talent procs for Ratio, allowing for an immediate double burst. You can probably tune a lot of cool things to happen with these two and enable some crazy 0 cycles.
Just remember Numby attacking and Ratio then following up from his ult proc in the same move won’t push Numby forward for his next attack.
Silver Wolf & DrRatio
Silver Wolf is another great teammate for the single target power she provides. Her def shred synergizes with his signature, it synergizes with a potential Quantum set, and her skill enables that Quantum set to go even further beyond since nearly no Imaginary enemies have Quantum weakness. She can provide all type res reduction, weakness implant, her three bugs, and def reduction on her ultimate. There is no doubt that with Silver Wolf, your debuff concerns are no longer a problem.
Additional Synergies & Teams
Welt can be a cool aoe sub DPS like Guinaifen can. It may seem cope at first, but if you have a SP positive third and fourth slot, you’re doing fine. Welt is going to be providing tons of debuffs that can stack on top of each other, as well as supply aoe damage for things Dr. Ratio doesn’t want to waste time on. Note they can’t stack their techniques.
Ruan Mei’s damage amp power is, as we know, incredible, but her ult being a debuff as well as her extending weakness break allows for two consistent debuffs on enemies during a burst turn that Ratio abuses immensely due to his spam of attacks. Even with the delay Ruan provides, some DPS just can’t cycle back to their next turn to abuse the Broken state damage increase unlike Ratio. Note that she consumes debuff turns with her delay which can be anti-synergistic with low debuff timers; imprisoning with a Ratio break can help mitigate this.
Tingyun benefits his very frequent damage procs with her additional multipliers, does great buffing, and helps his rotations. I love Tingyun as a third slot for Ratio; she’s such a good unit.
Bronya can, in theory, be a very strong buffer for Ratio, but the SP usage is not sustainable unless you run a very fast Bronya and go SP neutral. Great hypercarry buffer as usual though.
For a free-to-play friendly team, I’d go for Tingyun, Pela, Ratio, and a sustain of your choice. For a fun team, try Clara, Topaz, Ratio for follow up spamming, though ideally with E1S1 Topaz for those debuffs.